Preparing Irish Sea Moss correctly is an important process to follow so you get the most out of your sea moss. The best way to do this is to wash your sea moss thoroughly in filtered water before soaking it.
Once you’ve made sure that all of the salt, sand and other impurities are washed off it is time to prepare for soaking.
Preparing Irish Sea Moss; to Soak or to Cook?
Cooking your sea moss will change the chemical and energetic structure it has. This is a lot like cooking any other fruits or vegetables.
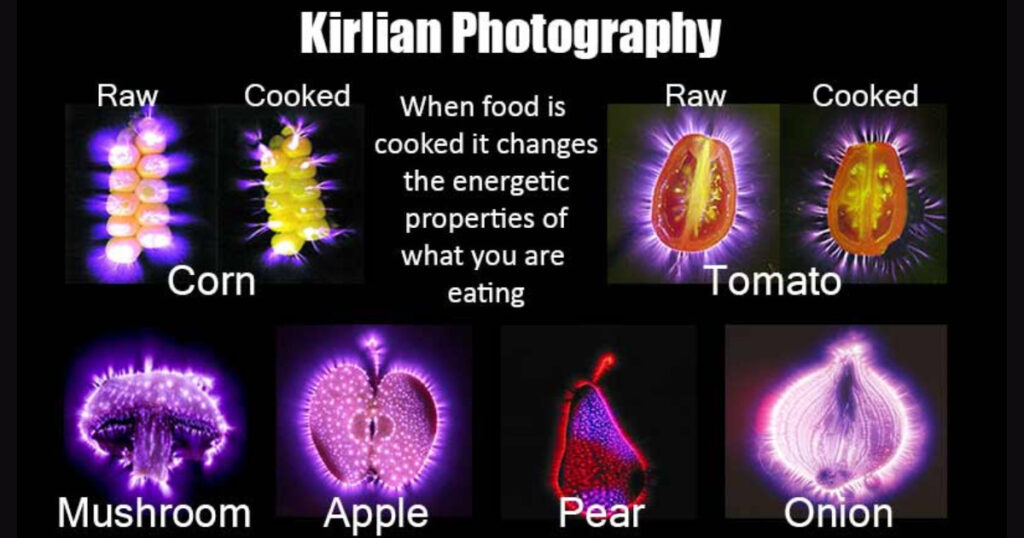
As you can see from the image below, the energy emitted by the fruits and vegetables before they were cooked is radiant. Afterwards, not so much.

So my advice to you is to avoid cooking your sea moss of you can. Many of the beneficial nutrientes will be lost when you cook your sea moss.
As you can see in the Kirlian photographs above, cooked foods loose the energetic life force. Treat it with more love and respect than cooking it.
Be patient when soaking it and you’ll benefit from the power that it will bring to you. I prefer to soak my sea moss in filtered, alkalized water with clear quartz, citrine, and amethyst. 1
These crystals help to charge the sea moss with energies associated with healing and abundance.
When soaking your sea moss, it can be more effective to use a large enough bowl and to place a small plate or saucer over it to keep the sea moss submerged. It’s going to naturally swell up and push above the water level as it re-hydrates.
Making Sea Moss Gel
As you have focused on preparing your Irish Sea Moss before getting to the stage of making sea moss gel, this is going to be so much easier.
The way I prefer to make my sea moss gel is to take the soaked sea moss out of the water and blend it.
Use only a small amount of the water it was soaking in (don’t blend your crystals – you think I’m kidding? I’ve seen this done), adding a little more water as you blend.
Be sure to use a silicone spatula to wipe down the edges of the blender when it is switched off.
After the first blending, you can get some chunks thrown to the top of the blender. Keep blending this for about 2 to 3 minutes for the creamiest texture you can get.
The more water you add, the runnier the mix will be, and less likely to set into a gel form. After a few batches you’ll find what works best for you.
Keeping in mind that this may change with each batch a little as you are dealing with a natural product.
Preparing Irish Sea Moss for Storage
Once you have made your gel, keep this in a jar with a sealable lid, in the fridge. If it is left at room temperature it can begin to turn and smell funny within 2 to 3 days. Stored in the fridge it can last as long as 3 to 4 weeks.
Make sure you always use a clean spoon to serve the amount of sea moss gel you want. Avoid putting dirty cutlery or your fingers in the jar.
I’ve seen people scoop the gel out with their fingers and wonder why it turns rancid within the week. There’s bacteria on your skin, and who knows what under your nails. You don’t want that swimming around in your lovely sea moss gel.
Using your Sea Moss Gel
This is as simple as adding a spoonful to your favourite foods or drinks. I’ve found that I’m adding sea moss to more and more of my meals. It started out with smoothies and raw cakes, where now I’ll stir it through anything I can to get the goodness it brings.
I’ve also been using a slightly smaller species of sea moss to make salads and add as a whole vegetable. This is a recently new method for me and it is proving to be very enjoyable.
Dressing the sea moss salad with a light combination of sesame oil and sweet soy sauce is getting almost addictive.
Storing your Dried Sea Moss
With the dried sea moss, keep this in a place where it won’t be exposed to moisture. If you have a sealable tub or zip lock bag these are great.
Keeping it in the fridge will also reduce the exposure to moisture, particularly in humid climates. Getting the most out of your sea moss is important to us, and we want to help you make sure you have all you need for preparing your Irish Sea Moss right off the bat.
Reference
- “Citrine Healing Properties, Meanings, and Uses” – Crystal Vaults Staff, Last checked 7 March 2024 [Crystal Vaults] [Archive] ↩︎
Last Updated on 5 months by D&C Editorial Team


The traditional sea moss drink that the Caribbean touts as a sex energy booster is and always has been cooked. I don’t understand how people are telling you that cooking sea moss kills the beneficial properties. If that’s true, how did the people who established the way of cooking it for hundreds of years discover that it had any benefits? Also, Dr. Sebi said that you cannot kill electric foods by cooking them, not even if you burn them to a cinder and sea moss is an electric food. I have been cooking my own in the traditional way and it works just like the Rastafari who taught it to my mother said it would.
Hi Sovery,
Thank you for your comment.
Cooking any food will not remove all of their nutritional benefits. Actually, tomatoes are one of those foods that increases in nutrient density when cooked. There are some foods like potatoes, taro and cassava are better cooked to prevent digestive issues.
The Kirlian photography shows the bio-electricity of both cooked and raw food. When the food is raw, it radiates a luminescent glow of vibrant energy using this technique. But the cooked food is dull by comparison and the life force energy has diminished. These images show that cooking food kills the life force energy.
Scientifically, the cooking process changes the molecular structure of the food and may distroy the enzymes. Food that has been cooked cannot bring forth new life, and it gradually starts to die.
According to Raw Food advocates, heating food past 118° F kills the life force energy. Therefore the food is dead. It may still contain some vitamins, minerals and nutrients but the quality and quantity are not as abundant as before.
Dr Sebi does talk about the energetic properties of foods and explains the benefits of eating alkaline foods.
If cooking your Sea Moss is part of your traditional recipe for a specific food or beverage and you’re happy with the benefits you get, that is great, keep doing you.
We are simply offering information based on our research and scientifically backed findings. It is completely up to you what you choose to do with this information.
How long do you soak in water the sea moss?
Hi Shah,
We have found that soaking your Sea Moss for 24 hours minimum and 60 hours maximum tends to have the best result.
Matthew wrote a detailed breakdown on how to best prepare your Sea Moss gel, which contains useful information on the soaking process under step 2. You can check the post using the link below:
Preparing Sea Moss for the Best Result
Hi! I read that you should only soak sea moss for 15 minutes to get the most benefits out of it. Others places say overnight. Is there any research/ data that shows which amount of time is better? Or is it from experience that overnight proves to be better? (I did try 15 min and it barely swelled) I am somewhat new to sea moss so I enjoy hearing about it from others more familiar with it. Thank you so much for the very informative article!!
Hello Mia,
Thank you for your question. This is really quite subjective, and will depend on your Sea Moss as a species, and how dried it is. Our Sea Moss is typically around 10% to 15% moisture content, meaning that as much as 85% to 90% of the water that is naturally occurring in it has evaporated during the drying process.
When preparing Sea Moss bought through our online store we suggest that, for our product, you allow this to soak for 24 to 48 hours.
Different types of Sea Moss and different ways of preparing it for packaging will mean that there will be different ways to get it ready to make into a gel. If you can see that it has swelled up and is softer (more jelly like), then you’re going to be able to blend it into a gel much easier.
I would suggest you try a small portion in one jar, and allow it to soak for 12 hours, leave that jar alone and then set up a second jar. Keep doing this with small pieces of Sea Moss until you have 3 jars. This should be something like the following: Jar 1 – soaking from the beginning (7pm on Thursday), Jar 2 – the next jar in line after jar 1 (7am on Friday), Jar 3 – the next jar in line after jar 2 (7pm on Friday).
Each time you set up a new jar, check the ones before it to see how they are going. Once you find the type of look you are expecting to see with your Sea Moss, you’ll have a better idea on how long to soak it for when preparing it.
I hope that this helps you, and would be keen to see how this goes for you if you wanted to send some photos through showing what you have done. That might also go a long way to helping others learn from your experience too.
Can you freeze seamoss gel? If yes, for how long ? Thank you !
Hi Weverton,
We have frozen Sea Moss at our household a few times in the past. It freezes comfortably in an ice cube tray, making it easy to put into a tea or a meal.
As we have not kept it in the freezer for much longer than 2 months I cannot say it will last much longer than that. Any other research I have seen on freezing Sea Moss gel recommends freezing for no longer than 3 months.
I hope this helps!